CLICK HERE FOR THOUSANDS OF FREE BLOGGER TEMPLATES »

Monday, November 9, 2009

Introducting the Quick & Easy Card Making Kit

Hi Stampeders!

I hope everyone had a great weekend :-)
The first Quick & Easy Card Making Kit is now available for purchase.  I've enjoyed designing this kit with the beautiful colors in the Holiday Lounge Designer Series Paper (DSP).  I have made this kit at an "easy" skill level so everyone can participate in making these cards and gift tags.  All the supplies contained in this kit are pre-cut for your convenience.


Dasher looks great in Taken with Teal Classic ink too!


It is getting to be that time of year when daily schedules seem to get jammed packed with extra "to-do's".  I have designed this kit with that in mind......Quick & Easy.


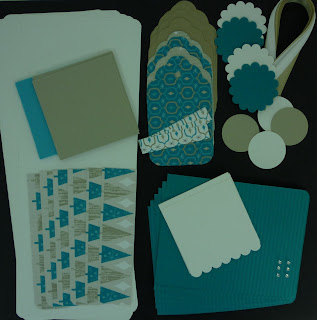
You will receive all the supplies (minus stamp and ink) needed to complete SIX 4 1/4" x 5 1/2" greeting cards and FOUR bonus gift tags.    


What else do I need?  Refer to the list at the bottom of this post for any other supplies you may need.  If you don't need anything else just buy this kit and you can wow your friends and loved ones for the holidays!  You can shop here if you would like to purchase the featured stamp Dasher or any other Stampin' Up! products.  


You can an also use this card kit to create your own designs using other stamps and inks that you already have on hand.  The choice is yours!  Use your creativity :-)    


With this kit you will also receive pre-printed step-by-step instructions (including over 30 photos) to assist you in completing these cute cards and tags.  


Don't have enough time to assemble them but would still like to send cards with that homemade look?  I am also offering this kit already assembled for $20.00.  This includes SIX fully completed Dasher image cards and all the bling, SIX Whisper White envelopes and FOUR completed gift tags stamped with To: and From: in the center circle.   


   Card Kit Price is just $15 (plus envelopes)
Pre-Assembled Card Kit Price is just $20 (plus envelopes)
The Card Kit ($15) Includes: 
  • 6 Pieces of scored and pre-folded  4 1/4” x 5 1/2” Whisper White Cardstock
  • 6 Pieces of 4" x 5 ½” pre-embossed Taken with Teal Cardstock
  • 6 Pieces of 1-1/4" x 5-1/8" DSP (Pattern Shown)
  • 6 Pieces of 2-3/4" x 2-3/4" Whisper White Cardstock (including scallop edge)
  • 6 Pieces of 2-7/8" x 2-7/8" Tempting Turquoise Cardstock (including attached Stampin' Dimensionals)
  • 6 Pieces of 3/8" x 6" Sand satin ribbon
  • 6 - 3mm clear rhinestones
  • 6 – Whisper White Envelopes
  •   4 pieces Kraft CS: 2⅜” x 4” die cut scallop tag for base
  •  4 pieces DP (in patterns shown): 2 ⅜” x 4” die cut scallop tag
  • 4 pieces DP (in pattern shown): ½” x 4”
  •  2 pieces Taken with Teal CS for circle mat: 1 ¾”scallop
  •  2 pieces Whisper White CS for circle mat: 1 ¾” scallop
  •  2 pieces Sahara Sand CS for image (To/From stamp or handwritten sentiment): 1 ⅜” circle
  • 2 pieces Whisper White CS for image (To/From stamp or handwritten sentiment): 1 ⅜” circle
  •  4 pieces White satin ribbon: ¼” x 8”
  • Step by Step Instructions to complete 6 cards + 4 gift tags

Your kit will be delivered directly to your door in a USPS flat rate shipping box for $4.95 (US orders)


Additional products you will need to complete cards as shown:
  • Sahara Sand Classic Ink Pad ($5.95) or Taken with Teal Classic Ink Pad ($5.95)
  • Dasher Stamp ($8.95)
  • SNAIL Adhesive ($6.95) or Glue Stick ($3.95)
  • Paper Snips ($9.95)


Choose Kit Option


Saturday, October 31, 2009

Happy Halloween Everyone!

We had a very spooky "devil's night" last night.  It was cold, rainy and very windy....gusts around 50 mph.  I thought I would share my cute treats for tonight.  I made 220 of these little treats and stapled assorted candybars onto the back.  I used some of my rustic twine to tie a bow.  I love all the funny images on the front.  I hope the kids will too.


 Have a fun and safe night tonight everyone and enjoy your extra hour of sleep on Sunday for anyone that has been on Daylight Savings time.....I sure will  :-)

Monday, October 12, 2009

Spooky Tree

Happy Monday To All!


I wanted to share this fun card with you. This stamp reminds me of the book I used to read to my children The Spooky Old Tree with the Berenstain Bears.


I used the watercolor paper from Stampin' Up!.  I really love this paper.  It is 140 lb. 100% cotton.  I used the "Rich Regals" classic inks in the following colors:  Night of Navy, Brocade Blue and  Elegant Eggplant.  I applied the colors with a watercolor technique blending from the top to the bottom.  I let it dry and then embossed this crazy spooky tree.  The image has a hidden face in the trunk so I used a Stampin' Write marker in Going Gray to subtly enhance the face.  I also used some silver brads in the corners and black glitter to accent the edges.

The inside is just sstamped with Basic Black classic ink and then I added clear rhinestone brads in the text for the look of eyes.


I'm going to send this card to my Aunt who lives in the lower part of Upper Michigan.  She lives alone and I'm sure she'd appreciate a fun card for Halloween.

Have a great day,
Darlene

Thursday, October 8, 2009

Scrapbook Room Re-Do Part 6

Hi Everyone!

I took some time today to finally apply the Butterflies and Definition wall vinyl that I purchased from Stampin' Up!'s Decor Accents line. I thought the nice dark brown vinyl would complete the look for my scrapbook room a.k.a. my "Creation Station" since it is a pretty small room.


In this picture I cut out all the butterflies and taped them in the location I chose with some painters tape. I then made registration marks lightly on the wall with a pencil for each individual image.


There are 23 butterflies total. Each individual image was then removed and the following process was followed.

Rub the grid side of the image with the applicator too. This causes the image to transfer onto the sticky part of the paper. I always rub from the inside out toward the edges.


Carefully peel back the grid paper SLOWLY to reveal the image.


Apply the image to the wall with the applicator using the registration marks made on the wall previously. Press down from the center toward the outer edges keeping the image smooth.


Slowly peel back the top paper revealing the final image. Rub the vinyl image lightly with your finger to make sure it is thoroughly pressed onto the wall.


Use a white eraser to remove the pencil marks from placement.


This is the final image. It looks very nice in person. Just the right touch for decoration on this special craft space of mine. LOVE IT!!!


I'll be posting some Halloween cards within the next few days. Check back for some Spooky ideas :-)
Darlene

Wednesday, September 2, 2009

Happy Wednesday

Hi Everyone!
I finally receive my starter kit from Stampin'Up! Way to cool of goodies in this box! I can't wait to start making cards and lots of other creations with their products. I've always enjoyed their stamps but now they have many other great products to offer. Below is the new Holiday mini-catalog. This catalog has a cute Build-A-Bear stamp set and awesome die cuts. It includes a boy and girl bear....click on the link below! I think you will love some of the projects.


I love the fact that Stampin' Up! offers online ordering now. Customers can order for the full price or use a demonstrator (hopefully me :-).... Darlene Plotinski) and get a discount. I also just started a stamping blog just for stamping projects. I have the link posted in my sidebar if anyone is interested.


I have also just finished taking a tour of the gardens in my backyard. The final flowers are blooming and I HAD to take a few pics. I hope to post the pics tomorrow or Friday. They are absolutely beautiful!


Til later.........
Darlene

Friday, August 28, 2009

Scrapbookroom Re-Do - Part 5 Cabinetry

Hi Everyone!

It's been a pretty busy place around here. My hubby and I have been working very hard assembling our oak cabinets for the scrapbook room. We used a beautiful warm stain with a satin urethane for the final finish. They will be installed against the east wall between the window. I will be able to store alot of my stamping goodies. I just became a Stampin' Up! demonstrator so I'm sure I'll have more supplies to store in the near future. I should be getting my starter kit maybe today so that is VERY exciting. I'll blog more about this later and give you info on my stamping website and business website too.


I did a few different layouts for this wall from my original sketch since I really need drawer space more than open storage. I ended up deciding on 11 drawers and 3 cabinet storage areas. That should work perfect for my use! This is not a very large room so the wall dimension is quite small.


These are the hardware pulls I chose. I am using the knob styled for the cabinet drawers and the other handle for all drawers. They are a pretty aged bronze finish. I found them at Lowe's and they were on clearance for $2.97 each. They will go really well with the warm feel of the room.


I have to sand the finish one more time and then put a final coat of finish on yet. Tom will install the hardware and then we should be ready to install them against the wall. We plan on putting a plywood countertop with oak veneer over both sets of cabinets since I will be having storage shelves mounted above them and then a black marble or granite slab set a few inches lower for my work area. I won't be using the area over the cabinets for a work area. I found it quite helpful to do a trial work area before I decided what I needed. I used my ironing board adjusted to the proper work area level sitting with my desk chair to make sure I felt comfortable working right in front of the window and having cabinetry to my left and right. It was perfect! Love the light from the window and love the availability of the storage on either side. I'll post more pictures when we install the cabinets so you can see exactly what I am referring to.

Well off to work!

Darlene

Tuesday, August 11, 2009

Spider Card

Happy Tuesday!

Whew has it gotten warm and muggy here in Michigan. We have had a pretty nice cool summer until now. I guess it's better than the ice and snow LOL!

I made a Halloween card today. I decided to make a window for my sentiment to show through. I also have not purchased any halloween patterned papers as of yet so I just made my own spider print with black archival ink and my spider stamp.


I altered my 3D origami flower design and used it for the spider body. I think he's pretty cute!
I also used my glue pen and drew on his head and body. He's pretty glitzy with that black glitter.


This is the inside. I added a bit more hand stamped spider patterned paper complimenting the front.

My peek a boo sentiment through a strip of transparency.

I hope you like him.....see you back here soon.

Darlene

Monday, August 3, 2009

A Mini-Vacation and stamps, stamps and more stamps!

Hi everyone!

I just returned from visiting my son and our grandchildren in St. Louis, Missouri. They were just a joy to watch playing together. It's hard to believe how fast they grow!

I went to a local stamp show this past Saturday and had a great time. I took my time slowly wandering from vendor to vendor. They have some awesome new products out but I decided to control myself and only by a few stamps for Halloween.

I played around today with my new cat stamp. I love to use my chalks to shade and bring a realistic look to my stamped images.


I decided to make a set of Happy Halloween gift tags to sell on Etsy. I think they came out pretty cute!


The black paper that I matted the cat image on has specks of metallic imbedded in the paper pulp. Pretty cool when it's in the light.

This is the inside. I just stamped the sentiment with black archival ink and added the rhinestone for the "O".

Well that's it for now. Thanks for looking......I'll be back with some more goodies soon :-)
Darlene

Saturday, July 25, 2009

A Creating Day

Hi there!

I hope you have all been doing well!

I spent a few day in the woods at our cabin getting some "quiet time" and now I'm back and doing some paper crafting today.

I felt like getting down and dirty with the glitter. That stuff is always flying everywhere but I just LOVE it! My dogs even had some glitz on their back when I finished these flowers today.

These are my flowers that I named SPARKLERS for obvious reasons. I used two shades of blue on this first set and then a really pretty lavendar in the next picture. Just love them!


I also made a flower card this afternoon.

Each layer I decided to do something different on for a nice layered effect. The bottom layer was stamped with black ink and then I added clear iridescent glitter here and there on the petals. I hand cut around each petal too. The next petal layer I used my sizzix die for the patterned paper shape and then glued that on black and cut around it. The center was printed (as well as the stem) from printable stamps I bought on The Cutting Cafe'. I used my metallic gel pens and made a few accents and then glittered the center flower with a complimentary turquoise glitter. I glued each layer with 3D glue dots. I decided to also get out the sewing machine and do a nice thread border. It was fun to sew on paper!


I thought the ribbons at the bottom added a nice finishing touch to this card.


MyFreeCopyright.com Registered & Protected

I think I'll start dinner and relax for the night. I wish you all a nice enjoyable weekend and I'll see you next week!

Saturday, July 11, 2009

A Beary Cute Birthday Card

Hi all!
It's pretty warm here today so I decided to stay inside and crank up the air conditioning and create a card.

This is my bear birthday card from the stamps I shared with you on an earlier post. The image is hand chalked and I added some maroon glitter to all the hearts. I also added Glossy Accents to the eyes and nose so they would shine. The bear is layered with a few colors of cardstock and I used 3D glue dots to add some dimension.


I stamped an additional 2 wings and again glittered the hearts and attached them over the original stamped image. I had to have the bear look like the wings were fluttering!


This is the inside. I just die cut some hearts to accent the front design and then inked the sentiment.


I added an iridescent gold organza ribbon for the bottom to finish the front off. I wanted the image to take center stage on this card.


'MyFreeCopyright.com
I hope you like it....
Enjoy your weekend :-)
Darlene


MyFreeCopyright.com Registered & Protected